Importing objects from DMS
DMS is a JewelSuite solution server that provides a professional, collaborative environment. Solutions from all JewelSuite products can be stored on the server and data mined, regardless of which JewelSuite product is being used.
Solution access is permission-controlled, and solution data and objects are additionally tracked for changes and updates, with options to notify, update or ignore.
This functionality allows multiple users to contribute to a solution or access a solution for additional or external support.
Data transfer between solutions enables process expedition and a progressive rather than re-inventive work environment. Subsequently, well analysis workflows are initiated by leveraging existing DMS data.
DMS also provides accessibility, visibility and continuity in data and solution management when roles and responsibilities have changed.
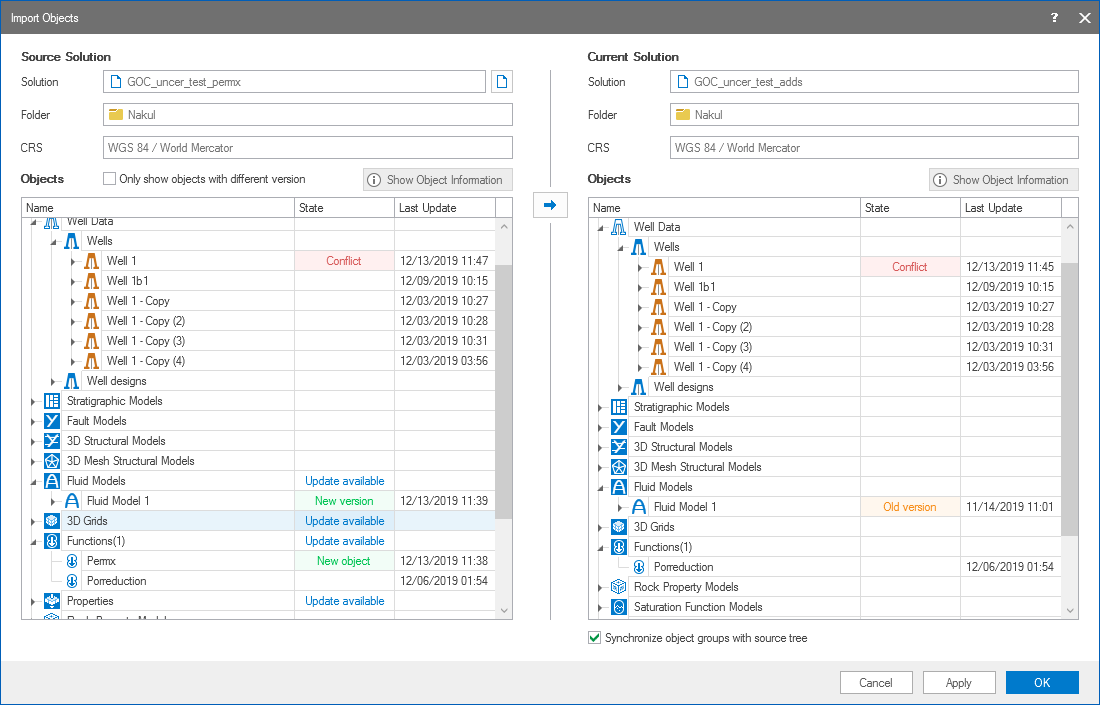
The Import from Solution form (home > Solution > Data Management Solution (DMS) > Import from Solution) allows you to import objects, properties, functions, models and volumetric cases from a source solution, saved in DMS, to your current solution. In order to do so, both the current and the source solution must be saved to the DMS server (the button is enabled only when you are working on a current solution that is saved to the DMS server).
As you open the form, the Current Solution section of the form shows the metadata, i.e. the solution name, folder and CRS. The Objects table listed below shows the objects available from the JewelExplorer along with the models (e.g. functions, function-based models, property models, property calculator models, fault seal models, etc.) and the volumetric cases saved in the current solution.
On the left side of the form, open a Source Solution by clicking on the adjacent solution file icon ![]() . By default, only solutions with the same CRS are listed. Select the solution that contains the objects that you want to import on the dialog and click OK.
. By default, only solutions with the same CRS are listed. Select the solution that contains the objects that you want to import on the dialog and click OK.
Optionally, you can uncheck the Filtered on CRS checkbox to list all solutions. If you select a solution with a different CRS than your current CRS, you can import geographic features, surface representations (tri-mesh, polyline, point set) and wells (well heads and wellbores, well pads, designs) with specific file formats. For more information on how to import data with a different CRS, see CRS Transformation.
Select any object in the objects table and use the Show Object Information button  to open the read-only object information dialog. The dialog lists the users who created and last edited the object, along with the respective date and time. This button is available for objects in both the current as well as source solution.
Importing objects from a DMS source solution to your current solution click to enlarge
The table that lists the objects in the current and source solution consists of three columns.
- Name Contains the name of the object (e.g. objects in the JewelExplorer as well as models such as function models, fault seal models, property models, etc). Expand the container folders to display underlying objects.
- State This column displays the status of the objects with respect to the current solution. Any changes in the source solution, with reference to current solution, is flagged with ‘Update available’ at the object folder level. If there is a new object or attribute in the source solution, ‘New object’ is displayed in the status. If there are changes to the objects or attributes in the current solution, objects table states it as ‘New version’ in the source solution and ‘Old version’ in the current solution. If the version trail of the object in source solution does not overlap with the version in the current solution, i.e. the objects do not have a parent child relation, then both the objects table shows ‘Conflict’ status. Use the filter icon
 to filter the source solution object tree on status.
 - Last updated Shows the last updated date and time for the objects and attributes. This is visible at the object level and not at the object folder level.
To maintain the object and model dependencies, the dependent models and objects are also available as updates in the source solution object table. While moving the updates from the source solution, JewelSuite also copies the dependent objects or models to your current solution. For example, if you create a 3D grid property using the function tool, the associated function is also copied to your current solution.
Only show objects with different version (source solution) This option filters only the objects or attributes that have changes with reference to the current solution. Check the adjacent checkbox to filter objects that have updates.
Synchronize object groups with source tree (current solution) This option visually synchronizes the objects groups in the current solution as you are working in the source solution objects table. Your current solution objects table replicates the actions as you access the objects table of the source solution. Check the adjacent checkbox to activate this functionality.
To import the objects from solution
Make sure that the source solution, from where you want to import the objects, is saved to the DMS server with the relevant changes.
- Click the file icon
 adjacent to the source solution name label to open the Select DMS solution dialog. The solutions listed on this dialog are filtered to match the CRS of the current solution. Select the correct solution and click OK. The objects and models from this solution are displayed in the source solution objects table.
 - Select the updates or new objects that you want to import to your current solution. You can multiselect updates in the source solution by holding the Ctrl key. Click on the Import icon
 to transfer the updates or objects to your current solution.
 - Click Apply to implement changes and keep working on the form. Click OK to close the form.